The following basic crochet stitches are perfect for beginners, especially in amigurumi patterns. If you are an amigurumi lover, you can’t resist the attraction to the art of amigurumi designs. You need to learn the most basic crochet stitches below for accomplishing any amigurumi patterns you love.
In this tutorial, you will find 2 groups of crochet stitches: basic crochet stitches and advanced crochet stitches. In the group of basic crochet stitches, you will learn the most essential crochet stitches for crocheting simple and easy amigurumi designs. With advanced crochet stitches, you will learn the most advanced crochet stitches that help you crochet more complex designs.
Now let’s get started with the first basic crochet stitches.
Basic crochet stitches
Basic crochet stitches include magic ring, chain stitch, slip stitch, single crochet, single crochet increase and decrease.
Magic Ring
Abbreviation: mr (MR)
A magic ring is the ideal way to start crocheting in the round. You start crocheting over an adjustable loop and finally pull the loop tight when you have finished the required number of stitches. The advantage of this method is that there’s no hole left in the middle of your starting round.
Start with the yarn crossed to form a circle (1). Draw up a loop with your hook but don’t pull it tight (2). Hold the circle with your index finger and thumb, and wrap the working yarn over your middle finger (3). Make one chain stitch by wrapping the yarn over the hook and pulling it through the loop on your hook (4). Now insert your hook into the loop and underneath the tail. Wrap the yarn over the hook and draw up a loop (6). Wrap the yarn over the hook again and draw it through both loops on your hook (7). You have now completed your first single crochet (8). Continue to crochet until you have the required number of stitches as mentioned in the pattern. Now grab the yarn tail and pull to draw the centre of the ring tightly closed (9). You can now begin your second round by crocheting into the first stitch of the first round. You can use a stitch marker to remember where you started.
If you do not prefer this technique, you can start each piece using the following technique: ch 2, x sc into the second chain from the hook – where x is the number of sc stitches you would make in your magic ring.
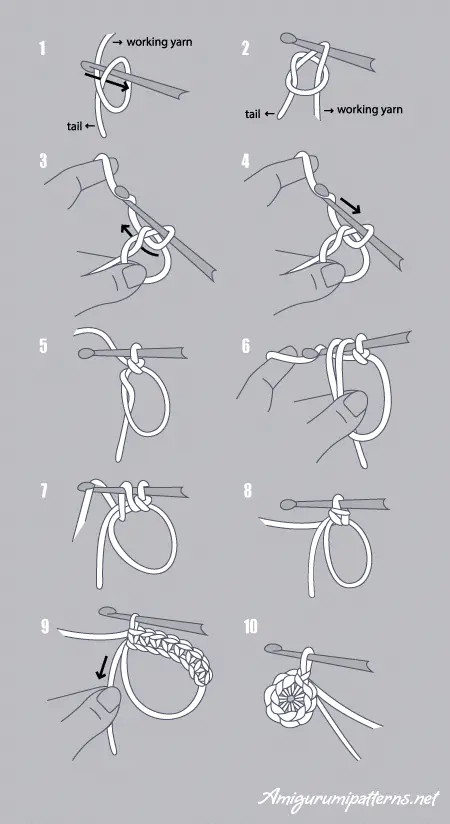
Let’s practice crochet a magic ring with these amigurumi patterns!
Crochet Chain Stitch
The stitch that always appear in any amigurumi patterns. It’s one of most basic crochet stitches you need to learn to crochet
Abbreviation: ch
This stitch is the basis for many crochet patterns. If you’re working in rows, your first row will be a series of chain stitches. Use the hook to draw the yarn through the loop (1) and pull the loop until tight (2). Wrap the yarn over the hook from back to front. Pull the hook, carrying the yarn, through the loop already on your hook (3). You have now completed one chain stitch. Repeat these steps as indicated in the pattern to create a foundation chain (4).
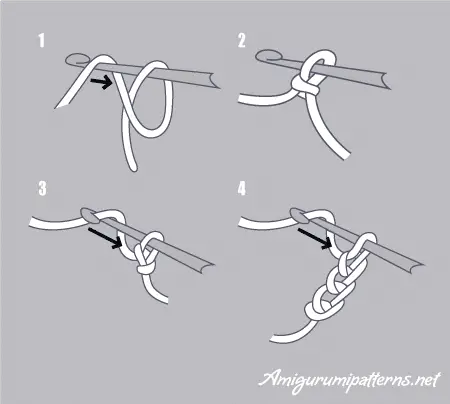
Let’s practice crochet chain stitch with these amigurumi patterns!
Crochet Slip Stitch
Abbreviation: slst (ss)
A slip stitch is used to move across one or more stitches at once or finish a piece. Insert your hook into the next stitch (1). Wrap the yarn over the hook and draw through both loops at once (2).
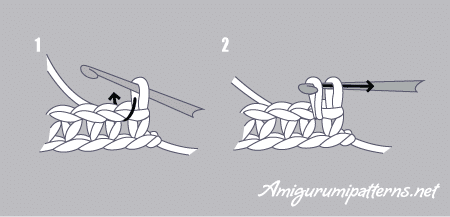
Let’s practice crochet slip stitch with these amigurumi patterns!
Crochet Single Stitch
This stitch is must-known basic crochet stitches. It appears in all amigurumi patterns or designs.
Abbreviation: sc (SC)
Single crochet is the stitch that will be most frequently used in this book. Insert the hook into the next chain stitch (1) and wrap the yarn over the hook. Pull the yarn through the stitch (2). You will see that there are now two loops on the hook. Wrap the yarn over the hook again and draw it through both loops at once (3). You have now completed one single crochet (4). Insert the hook into the next chain stitch to continue the row (5). At the end of the row (6) you need to bring the yarn up to the correct height to work the first stitch. Make one chain stitch (ch) (7) and turn the work (8). Start the next single crochet in the first stitch (don’t count the turning chain as a stitch). To work into a previous row of crochet, insert your hook under both loops of the first stitch, as shown in the figure (9).
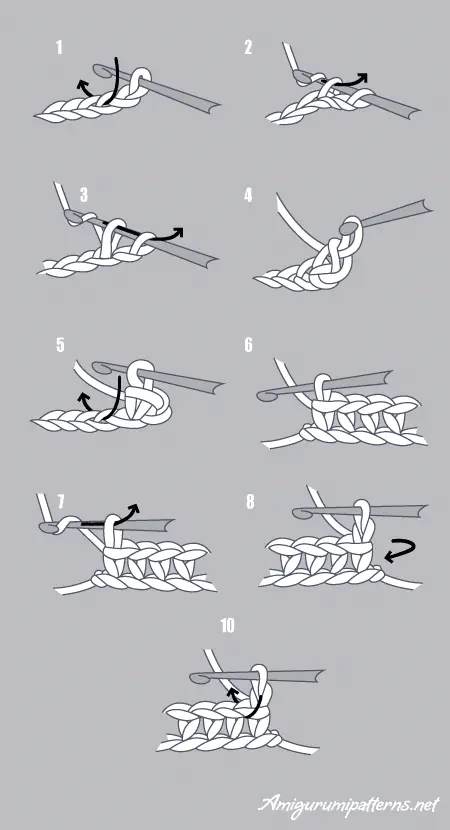
Let’s practice crochet single stitch with these amigurumi patterns!
Single Crochet Increase
Abbreviation: inc (INC)
To increase you make two single crochet stitches in the next stitch.
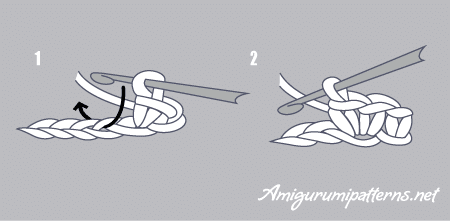
Let’s practice single crochet increase with these amigurumi patterns!
Single Crochet Decrease (invisible)
Abbreviation: dec (DEC)
The standard method of decreasing can leave a small bump or gap. The invisible decrease is an alternative method of decreasing which will make your decrease stitch look much like the other stitches in the row, resulting in a smoother and more even crochet fabric. Inset the hook in the front loop of the second stitch (1). You now have three loops on your hook. Wrap the yarn over the hook and draw it through the first two loops in your hook (2). Wrap the yarn over again and draw it through the two loops remaining on your hook (4). You have now completed one invisible decrease.
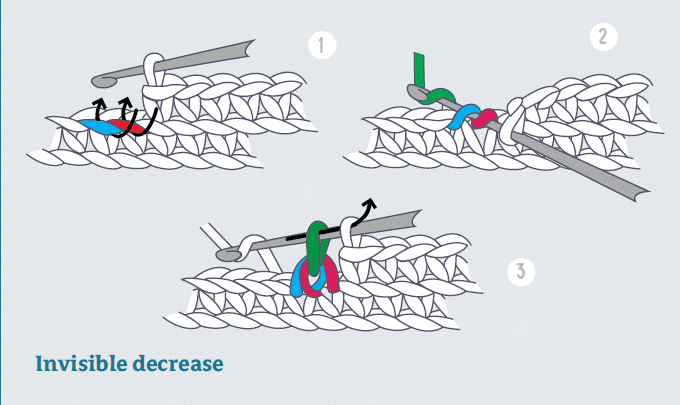
Let’s practice single crochet decrease with these amigurumi patterns!
Taking a crochet amigurumi course is an excellent way to learn a new skill, improve your crochet techniques, and create something unique and adorable. Don’t miss the chance to take a crochet amigurumi course! With expert guidance and hands-on practice, you’ll gain the skills and confidence to create your own adorable designs. Join now and let’s unleash your creativity together!
Advanced crochet stitches
Beside basic crochet stitches, if you want to crochet more complex amigurumi patterns, you will need to learn following most advanced crochet stitches. These stitches includes back loop only, front loops only, double crochet, half double crochet,…
Back Loops Only
Abbreviation: blo (BLO)
When making a crochet stitch, you end up with two loops at the top of the stitch, a front loop towards you and a back loop. When asked to crochet BLO you make the same stitch but leave one loop untouched.
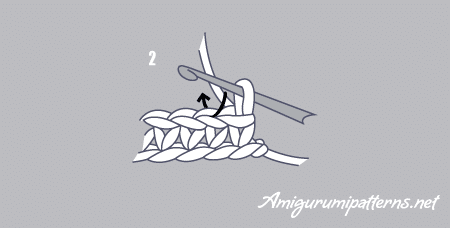
Let’s practice back loops only with these beautiful amigurumi patterns!
Front Loops Only
Abbreviation: flo (FLO)
When making a crochet stitch, you end up with two loops at the top of the stitch, a front loop towards you and a back loop. When asked to crochet FLO you make the same stitch but leave one loop untouched.
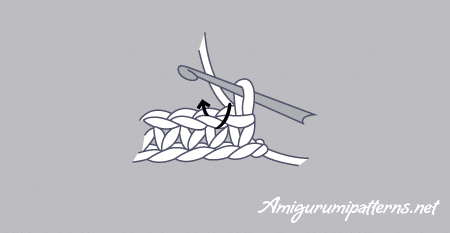
Let’s practice front loops only with these beautiful amigurumi patterns!
Double crochet
Abbreviation: dc (DC)
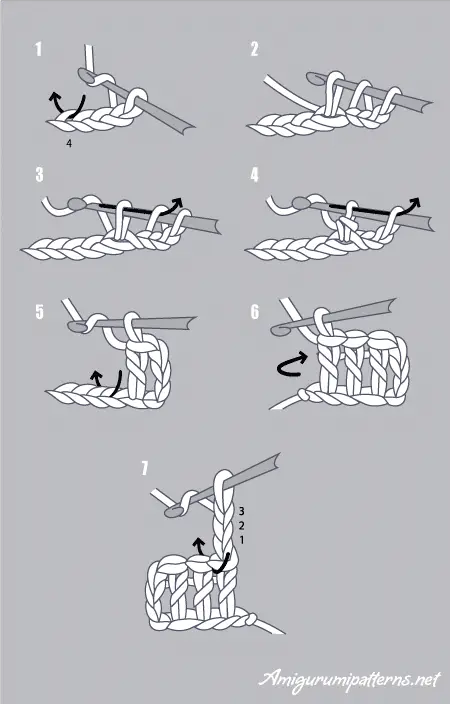
Bring your yarn over the hook from back to front before placing the hook in the stitch. Now insert your hook in the fourth chain – without counting the loop on the hook (1). Wrap the yarn over the hook and draw the yarn through the chain stitch. You now have three loops on the hook (2). Wrap the yarn over the hook again and pull it through the first two loops on the hook (3). You now have 2 loops on the hook. Wrap the yarn over the hook one last time and draw it through both loops on the hook (4). You have now completed one double crochet. To continue bring your yarn over the hook and insert it in the next chain stitch (5). Work the first stitch. To raise the yarn, make three chain stitches. Start the next double crochet in the second stitch. Be sure to insert your hook under both loops of this stitch (7).
Half Double crochet
Abbreviation: hdc (HDC)
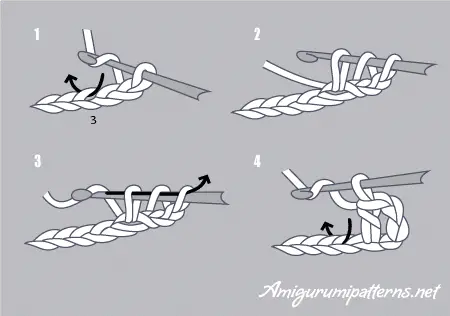
Bring your yarn over the hook from back to front before placing the hook in the stitch. Now insert your hook in the third chain – without counting the loop on the hook (1). Wrap the yarn over the hook and draw the yarn through the chain stitch. You now have three loops on the hook (2). Wrap the yarn over the hook again and pull it through all three loops on the hook (3). You have completed your first half double crochet. To continue bring your yarn over the hook and insert it in the next chain stitch (4). To start a second row, bring your thread to the correct height by making two chain stitches.
Back Post Single Crochet
This is a stitch that I sometimes use when making amigurumi toys. Refer to the following video tutorial from amigurumi.com for how to use back post single crochet stitch.
Want to use this stitch in real action, check out my creepy patterns that use this back post single crochet stitch.
Puff Stitch
In this video tutorial, I use a haft double crochet stitch to make the puff stitch
Click here to check out free patterns that use puff stitch.
Summary, in this tutorial, you have learned the most basic crochet stitches. These stitches will help you feel more comfortable crocheting the most beautiful, simple, and easy amigurumi patterns.
Frequently Questions and Answers
What are basic crochet stitches for beginners in amigurumi patterns?
Basic crochet stitches includes magic ring, chain stitch, slip stitch, single crochet, single crochet increase and decrease. You will always find these basic crochet stitches in any amigurumi patterns or designs.
How to crochet magic ring?
Start with the yarn crossed to form a circle (1). Draw up a loop with your hook but don’t pull it tight (2). Hold the circle with your index finger and thumb, and wrap the working yarn over your middle finger (3). Make one chain stitch by wrapping the yarn over the hook and pulling it through the loop on your hook (4). Now insert your hook into the loop and underneath the tail. Wrap the yarn over the hook and draw up a loop (6). Wrap the yarn over the hook again and draw it through both loops on your hook (7). You have now completed your first single crochet (8). Continue to crochet until you have the required number of stitches as mentioned in the pattern. Now grab the yarn tail and pull to draw the centre of the ring tightly closed (9).
How to do a crochet slip stitch?
Insert your hook into the next stitch (1). Wrap the yarn over the hook and draw through both loops at once (2).
How to crochet chain stitch?
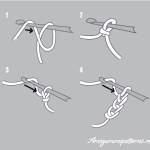
Use the hook to draw the yarn through the loop (1) and pull the loop until tight (2). Wrap the yarn over the hook from back to front. Pull the hook, carrying the yarn, through the loop already on your hook (3). You have now completed one chain stitch. Repeat these steps as indicated in the pattern to create a foundation chain (4).
How to single crochet?
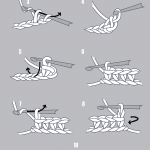
Insert the hook into the next chain stitch (1) and wrap the yarn over the hook. Pull the yarn through the stitch (2). You will see that there are now two loops on the hook. Wrap the yarn over the hook again and draw it through both loops at once (3). You have now completed one single crochet (4). Insert the hook into the next chain stitch to continue the row (5). At the end of the row (6) you need to bring the yarn up to the correct height to work the first stitch. Make one chain stitch (ch) (7) and turn the work (8). Start the next single crochet in the first stitch (don’t count the turning chain as a stitch). To work into a previous row of crochet, insert your hook under both loops of the first stitch, as shown in the figure (9)
How to single crochet increase?
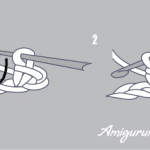
To increase you make two single crochet stitches in the next stitch.
How to single crochet decrease
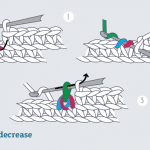
Inset the hook in the front loop of the second stitch (1). You now have three loops on your hook. Wrap the yarn over the hook and draw it through the first two loops in your hook (2). Wrap the yarn over again and draw it through the two loops remaining on your hook (4).
Join my list to get notified of new free patterns, PDFs, and exclusive offers.

![Bear Keychain Crochet Free Pattern [Among Us Style] Bear Keychain Crochet Free Pattern [Among Us Style]](https://lennutas.com/wp-content/uploads/2021/07/bear-keychain-thumb-1200-765.jpg)
![Cutie Bunny Crochet Free Pattern [PDF] bunny crochet](https://lennutas.com/wp-content/uploads/2021/08/bunny-crochet-free-pattern-s2.jpg)
Pingback: Q&A: Can you knit Amigurumi? | Knitting Women